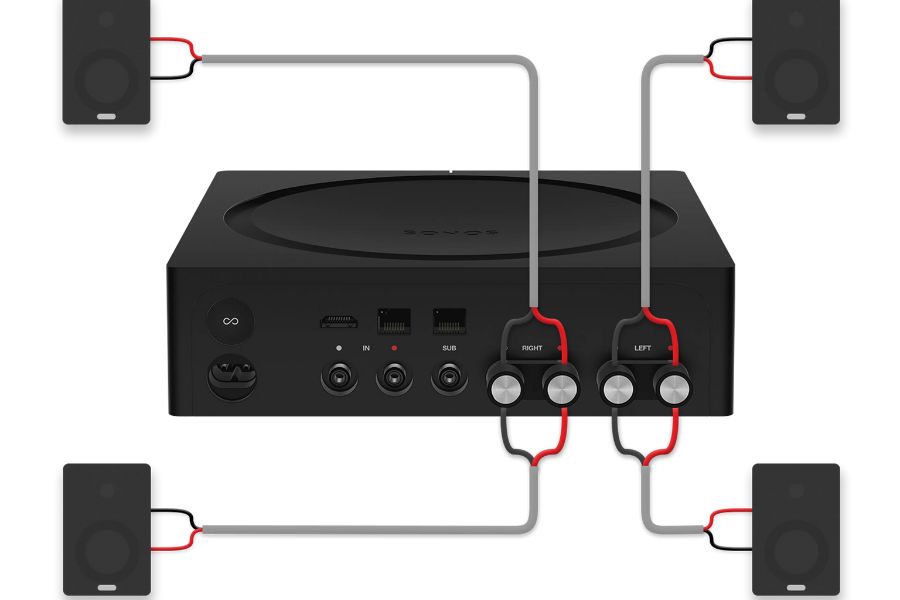
Many people connect four speakers to a two-channel amplifier to make music better in larger spaces or more realistic. This form helps home cinemas and sound systems that connect more than one room spread sound out evenly.
Match your speakers to your amplifier for a good set-up. No matter what kind of wires you use, make sure the sound is even and that you don’t overheat the equipment.
Audiosk will teach you how to connect 4 speakers to 2 channel amp that the music sounds good and fits with your musical preferences.
How To Connect 4 Speakers To A 2 Channel Amp?
Audio fans are familiar with two main wiring methods: parallel and series. Each has its own perks and is best for different setups. There is also a simple choice, such as using a sound selector switch, which makes the process a lot easier. Let’s look at these and see which one might work best for your needs right now.
Parallel Configuration
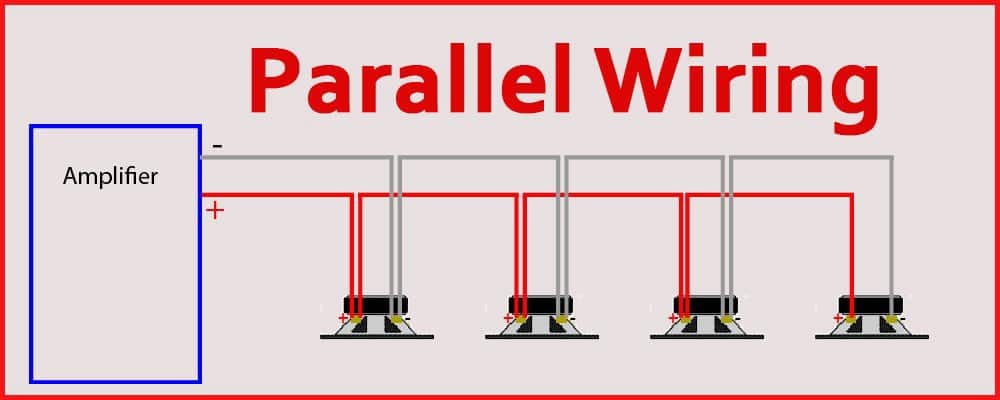
Parallel wiring works best when all connected speakers have the same impedance. This wiring method generally provides the best sound quality, assuming the amplifier can handle the lower impedance load.
Step-by-Step Guide: Connecting 4 Speakers to a 2-Channel Amp in Parallel
Step 1: Gather Your Gear
Grab your 2-channel amp, four passive speakers, and enough speaker wire.
A basic grasp of audio gear is essential here. Can you tell the difference between the amp and speaker terminals? That’s where we start.
Step 2: Match Power Ratings and Find the Terminals
Check if your amp is cool with the lower impedance from parallel wiring. Then, spot those positive (+) and negative (-) terminals on both your amp and speakers.
Get your head around electrical terms like impedance. Knowing your plus from your minus on terminals is key.
Step 3: Wiring Time – The Parallel Way
Connect all speakers in parallel. This means linking the amp’s positive terminal to all the speaker positives, and the same for the negatives.
Be precise here. You want each speaker hooked up correctly. Remember, in parallel, impedance goes down. Use this formula to stay safe: 1/Total Impedance = 1/Impedance of Speaker 1 + 1/Impedance of Speaker 2, and so on. Make sure your amp can handle this to avoid any overheating or damage.
Step 4: Test and Tidy Up
Power up and test the sound. Double-check those connections are snug and right.
A bit of basic testing know-how and some troubleshooting if needed. Usually, this is pretty straightforward, but sometimes, it might need a bit more digging to get things perfect.
Evaluating Parallel Wiring
Pros
With the parallel wiring method, each speaker may get more power, which might increase the loudness and make the music more dynamic.
This method is perfect for amplifiers that can manage loads with a lower impedance.
You should use it outdoor or when you have expansive spaces that need a bigger sound.
Cons:
Remember, not all amps can take the lower impedance in stride.
When using this, all your speakers need to have the same impedance for a balanced sound.
Careful wiring and familiarity with electrical concepts are prerequisites for a proper installation of parallel wiring
Series Configuration
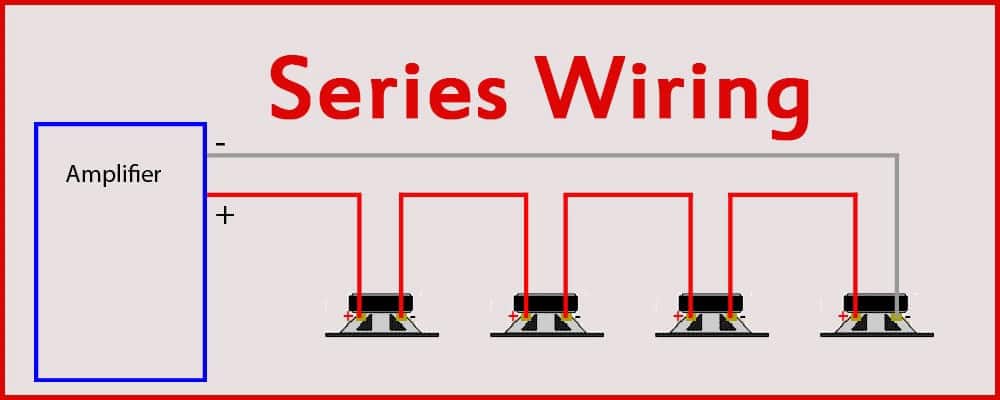
If your amp isn’t a fan of low impedance, series wiring is your go-to. It’s super reliable and works with a variety of amps. Keep in mind, though, that the sound clarity might not be the best. The total impedance could limit how much power each speaker gets, which might affect loudness and clarity.
Step-by-Step Guide: Connecting 4 Speakers to a 2-Channel Amp using Series wiring
Step 1: Gather Your Equipment
Grab that 2-channel amp, your four passive speakers, and enough speaker wire.
What you need is a little knowledge about audio gear. Can you spot the amp and speaker terminals? That’s your starting line.
Step 2: Impedance Check
Make sure each speaker’s impedance doesn’t push the amp too hard. Plus, you’ll need a sharp eye to accurately identify those positive (+) and negative (-) terminals.
Your task here is to make sure the impedance of each speaker is compatible with your amp’s capabilities. Each speaker comes with an impedance rating, measured in ohms. Your amp has a range within which it can operate safely — and happily. If the total impedance of your connected speakers is too low or too high for the amp, it can lead to poor sound quality or even damage your equipment.
Step 3: Connect the Speakers in Series
Connect the amp’s positive to the first speaker’s positive. Then, play the chain game—link each speaker sequentially from negative to positive. Cap it off by connecting the last speaker’s negative to the amp’s negative.
In series, the total impedance equals the sum of all the speakers. And also, pick the right speaker wire gauge based on your amp’s power and wire length. Thicker wires are your friends for more power and longer runs.
Step 4: Testing Time
Now it’s time to fire up the system, test the sound, and double-check those connections.
You might need basic testing chops and a bit of troubleshooting prowess, just in case.
Evaluation of the Method
The Good Stuff
For this method, every speaker is given an equal amount of power.
In order to prevent damage to your amplifier, smart impedance control ensures that it does not become overloaded.
In general, connecting devices in series is easier than connecting them in parallel.
The Difficult Parts
Remember that the total impedance may interfere with the power supply to your speakers, which might lower the loudness and quality of the sound.
Connectors and resistance must be set up correctly. If even one wire is twisted, you might be in for some serious equipment problems.
Using a Speaker Selector Switch
This method is a breeze for setting up and keeping your speakers safe. It’s not quite the fit for high-power systems or if you’re all about that top-tier sound quality.

Step by Step Guide
Step 1: Connect Amplifier to Speaker Selector
Join the speaker selection switch’s input terminals with the output terminals of your 2-channel amplifier. Typically, they have labels; so, you should aim to connect the “output” of the amplifier to the “input” of the switch.
Check the alignment and security of the connections. In most cases, this entails connecting the amp’s red (positive) and black (negative) terminals to their respective switches.
Step 2: Connect Speakers to the Selector
Attach each of your four speakers to the outputs on the speaker selector switch.
The terminals on each speaker are usually red (positive) and black (negative). Compare these to selector switch outputs. Make sure the connections are tight to avoid audio loss and interference.
Step 3: Test the System
Power up your amplifier and activate the speaker selector switch. Then, test each speaker individually to ensure they are all receiving audio from the amp.
You should know how to use your amplifier, selection switch, and basic troubleshooting. First check the switch and speaker connections if a speaker isn’t functioning.
Evaluation of the Method
Benefits
The Selector allows connecting multiple speakers to a single amplifier without having to deal with complicated wires.
It gives a good protection with keeping the amplifier from overheating by controlling the total voltage load.
In this way, different speakers can be controlled separately, which is helpful for setups with more than one room.
For safety, It lowers the chance of linking speakers whose impedances don’t match.
Challenges
There might be some power distribution problem, each speaker might not get the same amount of power as with a straight link.
Depending on how good the choice switch is, it might change the sound quality.
It can have some limits on Amplifier Power, usually works best with amps that don’t put out as much power (up to 100 watts).
General Rules for Speaker Wiring
Speaker wire instructions are very detailed and needed for safety and best performance, but people who are new to audio devices may find them hard to understand.
- Check equipment specs: It is very important that the voltage, power handling, and connections on your amplifier and speakers match.
- Use the Right Speaker Wire: This is where setup matters. Choose a thicker wire with a smaller gauge if your amplifier is strong or your speakers are far apart. Remember that we want efficient and safe power transmission.
- Avoid Exceeding Amplifier Limits: Avoid over-amplifying your sound. Be kind to it. To prevent damage or overheating, keep it within its power restrictions. We want to maintain its optimal operation.
- Keep Cables Organized and Protected: Make sure your cords and cables are labeled and organized. Avoiding places with sharp edges or heavy foot traffic is of the utmost importance.
Choosing and handling speaker wire is the most important but also hardest rule. It’s important to know the wire size, amplifier power, and speaker distance in order to do this. Mastering this part makes power flow more efficient and sets the stage for other rules, like getting around amplifier limits and organizing lines.
Conclusion
The choice of method will largely depend on the specific characteristics of your speakers and amplifier, as well as your personal priorities (e.g., sound quality vs. ease of setup).
If sound quality is paramount and your amplifier supports it, parallel wiring is often preferred. However, for ease of use and safety, especially in multi-room settings, Audiosk chose speaker selectors (either standard or impedance-matching), which are very effective in this situation.
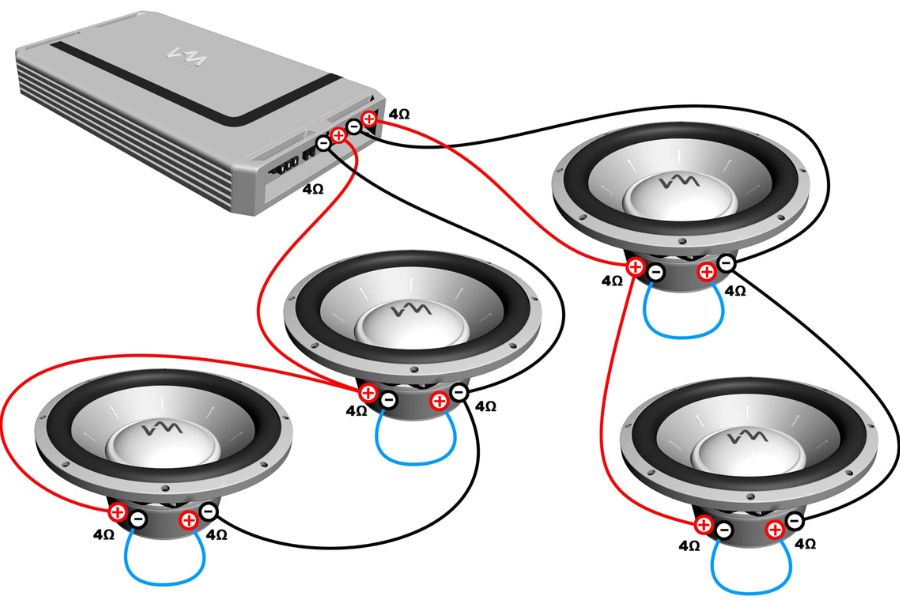
The series-parallel configuration can be a middle ground for balancing impedance and power distribution but requires more technical setup.