The process of setting up ceiling speakers to a receiver involves such simple wiring, impedance matching and audio configuration rules in order for them to produce the best sound. Ceiling speakers are perfect for home audio, as they offer great sound quality and can be located anywhere in the room. The are well renowned for their consistent, good sound.
We’ll assist you in establishing your connection process for powering up passive ceiling speakers. Always begin by reading the instruction manuals for your particular receiver and speakers so you know what they need first and if compatibility is required. Check out Audiosk, your go-to place for awesome audio content that’s ready and waiting for you!
Why Use Ceiling Speakers?
Ceiling speakers are designed for long-lasting and nice-looking sounds in your room.
Putting speakers in your ceiling is helpful in many ways, especially in saving space. Imagine you want to put speakers in a small bathroom; ceiling speakers are perfect for not taking up much room. In a bathroom, it’s really smart to use speakers that can handle water in the ceiling.
To put in ceiling speakers well, you need to be able to reach behind the ceiling or walls to put in the speaker wires.
How To Connect Ceiling Speakers To Reciever?
Adding ceiling speakers is a fantastic way to upgrade your home audio system and enjoy surround sound. These speakers are perfect for integrating your audio setup into a room without using extra space.
Whether you’re setting up new ceiling speakers or using ones you already have, the way to connect them to a receiver is the same. And if you’ve hooked up other kinds of speakers to a receiver before, it’s pretty much the same process with ceiling speakers.
Here are the steps to connect ceiling speakers to a receiver:
Step 1: Turn Everything Off and Unplug
Before you plug in the power to the wall, all the equipment at home must be turned off. By doing that, you ensure that you are protected from electric shocks and power surges.
Also remember to disconnect other receivable devices like a TV, or an amplifier. Other connected devices may still pose a risk of electric shock even though the receiver has been unplugged.
Although your ceiling speakers are probably not in a plugged connection, you still need to make sure that all the things are in an unplugged mode as you start the installation process.
Step 2: Get Your Speaker Wires Ready
Now, it’s time to prepare your speaker wires for connection. If you already have ceiling speakers installed, you might skip this step because the wires should be ready from previous use.
But, if this is your first time setting up the speakers, you’ll need to place the wires in the right spots. You’ll also need to strip the ends to reveal the bare wire, which will connect to the back of your receiver.
Start by cutting the wires to the right length. Always leave a few extra feet of speaker wire, just in case you need more or have to adjust something.
Ceiling speaker wires often go through, behind, or along walls. Measure the wire you need, then cut it with wire cutters. Next, run the wire to where it needs to go and secure it properly.
Once your speaker wire is in place, strip the ends. The speaker wire has two wires inside a plastic cover. You can easily pull them apart to separate the stereo channels.
Strip about a half-inch of the plastic cover off to expose the bare wire. Wire cutters are perfect for this, but be careful not to cut the wire itself, just the outer cover.
Do this for every speaker wire. Each wire needs two stripped ends, which means four bare wires for each length of speaker wire. For example, if you have two ceiling speakers, you’ll end up with eight bare speaker wire ends.
Step 3: Connect the Speaker Wire
The exposed speaker wires need to be connected. The wires should be attached to the speakers as well as the receiver. Ensure that you do so for each ceiling speaker that you are utilising.
First, wire the speaker. Tabs are provided on most ceiling speakers to secure a speaker wire. Slide enough bare wires into each of these tabs for the connection with each channel.
Lastly, attach the other end of the speaker wire into the corresponding input on the receiver. This is essential in case I want my ceiling speaker to operate as a surround sound speaker. Then, connect it to the surround sound input at the receiver.
In case your receiver has no dedicated input for surround sounds, you can use the speaker wire to connect it in either the left or right channels. In this manner, the speaker can generate the same sound like any other speakers you may own.
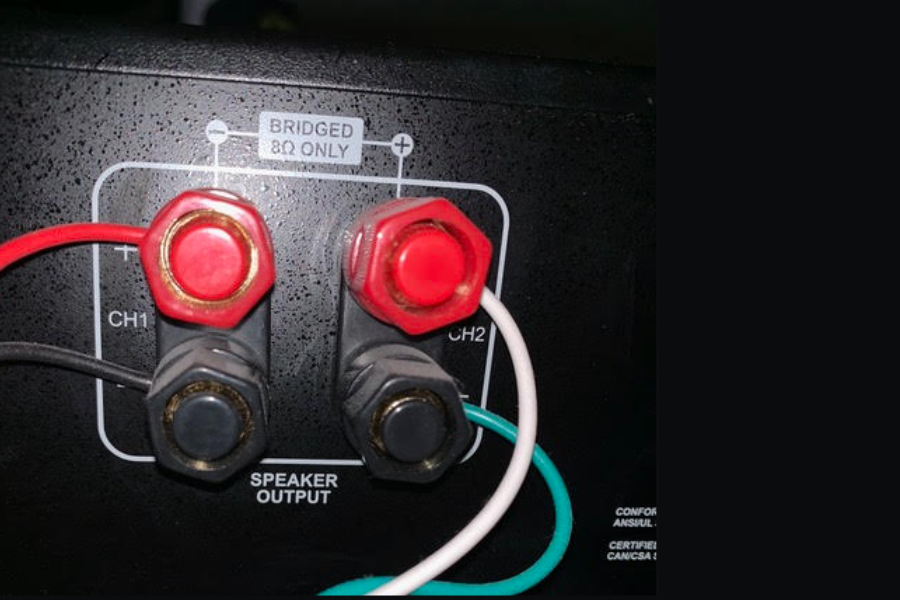
The speaker inputs are very easy to identify on the receiver as they are often well-marked. The speaker wire normally connects by either push or pull-back tab. Check that the speaker leads connect to the same channel (left or right) that is set on the receiver.
Follow the same procedure for every ceiling speaker. Simply change the speaker input on the receiver to whatever speaker you are placing.
Step 4: Check the Sound
Now connect everything and turn on your audio equipment. After setting up your system, it is important to test it to ensure everything is alright and that all the connections have been done right.
Switch on your television and other audio equipment. Turn up the sound by connecting it to a sound source such as your TV/mobile. Turn on the music to check if all the speakers you plugged in are making a sound by walking about your room.
When there’s no sound coming from any speaker, then this is the time to find solutions to make everything work like normal. Normally, this issue could be that the speaker wires are not properly linked to the receiver or speakers.
Make any needed changes. Always, remember to switch off and unplug your system before you move the wires or do anything electrical.
Step 5: Relish Your Sound Experience
When you test everything and it works fine, you are ready to go ahead and take pleasure in your future audio system. The installation of the ceiling speakers really increases your system, especially for movies and music mixed for surround-sound.
However, it is good to note that you can change these later on if need be. However, provided that your ceiling speakers are correctly installed and linked to a receiver, additional adjustments or changes are rarely necessary. Have a nice day and appreciate the new sound quality and depth in the space.
Benefits Of Installing Ceiling Speakers
Ceiling speakers come with lots of benefits, both in homes and business places.
Ceiling speakers mean you don’t need big speakers on the floor or wall. They fit right into the ceiling, so you keep your floor space. They also blend in with your room’s look. Ceiling speakers are hard to notice and don’t mess with how your room looks.
If you have several ceiling speakers, they spread the sound out well. This means no spots in the room where you can’t hear well. It’s really good for big rooms or places with an open design.
Putting in ceiling speakers is pretty easy, especially if your ceiling is the kind you can move tiles in. Many ceiling speakers come with patterns and parts that make putting them in simpler.
Ceiling speakers are up high, so they’re less likely to get bumped or broken. This also means less mess and less chance of tripping over them, unlike speakers on the floor.
Kids and pets can’t reach ceiling speakers, so they won’t break them or play with them. This makes ceiling speakers a neat and safe choice compared to regular speakers.
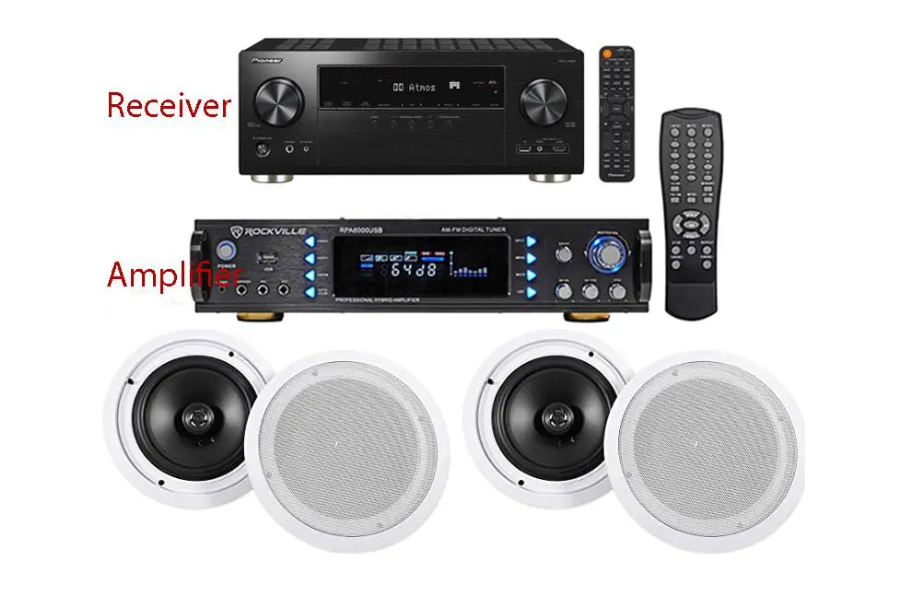
Can You Connect Any Speakers To A Receiver?
Yes, you’re usually able to plug in any speakers into a receiver because most receivers and amplifiers of today have been designed for compatibility with many different types of speaker.
First of all, before establishing connection between the speakers and receiver or amplifier, it is necessary to check that particular specifications fulfill each other. Impedance is measured in ohms and one of the main factors to be taken into consideration. Impedance matching is crucial for your audio system to function safely and effectively.
Further, take into account the power capacity of both speakers and receiver measured in watts as well as a type of available connections, optical inputs, speaker wire terminals etc. Based on these technical aspects, good pairing ensures that the performance and lifespan of your setup is optimal.
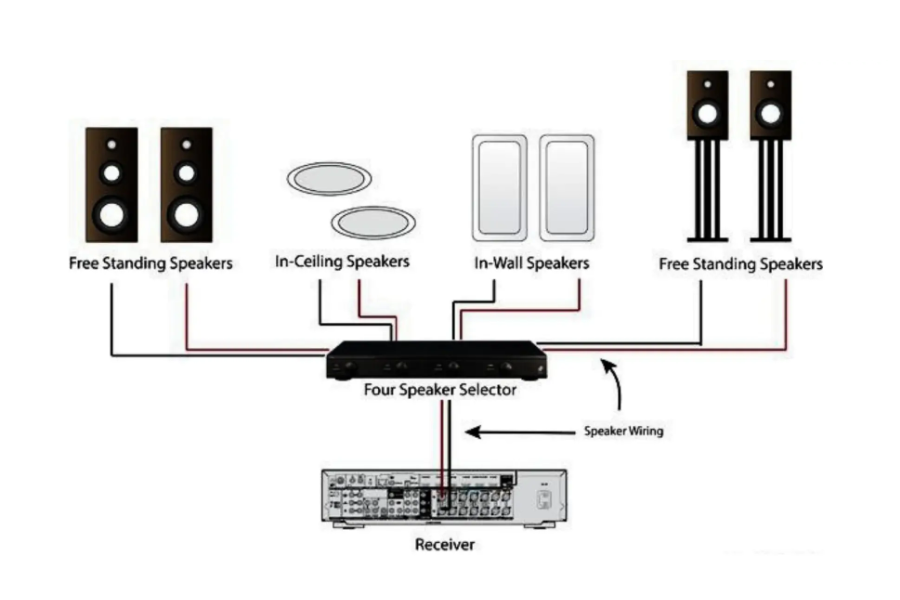
When connecting ceiling speakers to a receiver, a common query is how to connect 4 speakers to a 2 channel amp. This setup is possible and can enhance your audio experience. The key is to wire the speakers correctly, maintaining the amp’s stability and sound quality.
For a 2 channel amp, you can link two speakers to each channel. Ensure you match the amp’s impedance requirements with the speakers’ total impedance. This careful setup allows you to enjoy a rich, room-filling sound from your ceiling speakers, using a 2 channel amp to its full potential.
Besides, to ensure all ceiling speakers work with surround sound, connect each to the right channel on your receiver and activate the surround sound mode. This setup creates a seamless and rich audio experience in your room, making the most of your ceiling speakers.
How Many Speakers Can You Connect To At Once?
To connect two Bluetooth speakers simultaneously, you need dual audio capability. Many smartphones, TVs, computers, and tablets made since 2017 come with Bluetooth 5.0. This technology lets you connect up to seven Bluetooth devices at the same time.
The number of speakers that can connect to a receiver in one shot is largely based on the number channels available. A 2-channel receiver would work with 1 average speaker, a 5 channel one – with 5 and so forth.
The number of channels in home theater receivers is usually between 2 and 11 to suit a variety of audio configurations. However, it is essential not to overload the recipient by connecting more speakers than his or her capacity can handle. Overloading can cause bad sound quality or destroy the equipment.
Moreover, some receivers have multi-zone audio features that enable different audio playback in various zones thus potentially affecting the number of speakers connected. Always consult the receiver’s manual or specifications for this before attempting to connect multiple speakers.
Conclusion
That’s the way to connect your ceiling speakers to a receiver. Usually, the connection is pretty straightforward. But, setting them up takes time and effort and sometimes you might need an expert’s help. Discover the world of superb audio at Audiosk – your final stop for amazing sound experiences.